Customize screen layouts
Use the Screen Layouts tab in the Settings panel to add, reorder, or remove screen layouts from the Screen Layout tool on the toolbar. Screen layouts can be configured at a site, group, or user-level by the system administrator. Or, if the system administrator has enabled this feature for users, an individual user can configure their own screen layouts.
Note
Clicking Reset will reset all screen layouts back to the default screen layouts that were set by your system administrator. That is, all of your custom screen layouts will be reset.
- In the upper-right corner of the viewer, click
 > Screen Layouts.
 - Add study compare modes, series layouts, or image layouts. (See more details below.)
- If you are satisfied with your changes, click Save. To revert any changes you made since your last save, click Cancel.
|
|
Monitor layout NOTE: Monitor layout applies only to study compare modes. You can define a study compare mode per monitor layout (1, 2, or 4 monitor) or you can configure the same study compare modes across all monitor layouts. Select the monitor layout that you want to configure compare modes for. For example, select single monitor and then click If you customize study compare modes for any of the monitor layouts, and then click |
|
|
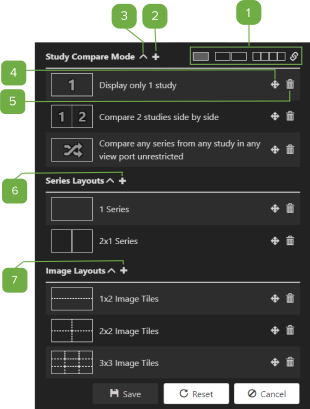
Add study compare modes Study compare modes control the layouts when prior studies are in view in single or multi-monitor modes. eUnity comes with a predefined list of study compare modes. Click |
|
|
Collapse section Click |
|
|
Reorder Click |
|
|
Delete Click |
|
|
Add a series layout Series layouts define the number of series to display from each study. There can be a maximum of 15 series layouts shown in the Screen Layout tool on the toolbar. Click |
|
|
Add an image layout Image layouts define the number of images to display from a single series. These are also called image tile layouts. There can be a maximum of 6 image layouts shown in the Screen Layout tool on the toolbar. Click |

 beside

 to collapse or
 and drag the layout to the desired position. The order of the layouts in this panel corresponds to the order in which the layouts are displayed in the Screen Layouts tool on the toolbar.

